Blog Background

Thursday, June 28, 2012

Puttin' On The Glitz

Good Evening! How are you? Things around here are very sparkley these days. In case you haven't noticed, I have been using a lot of glitter on my cards lately. My poor hubby is reminded every time he looks at himself in the bathroom mirror; although he no longer asks why he has a red, green or blue sparkle stuck to some part of his face, lol.
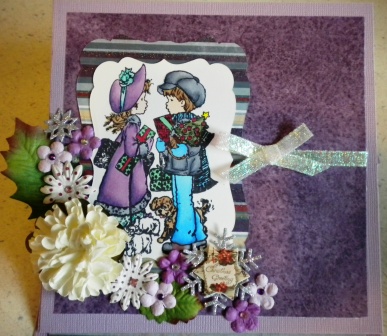
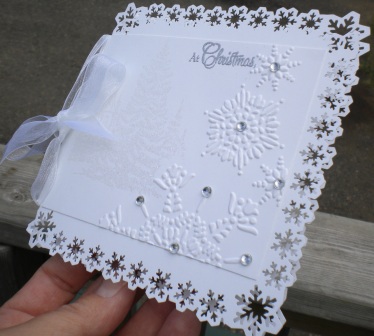
Now that we have all had a bit of a snicker, lets get to tonight's card shall we. It is another Christmas card that I am sharing and it has a TON of glittery goodness on it :) I even managed to make this one without ANY flowers. This card is pretty CAS I think; funny how that style can sometimes be the most difficult to create. At the rate I'm getting the Christmas cards done with all the fabulous Christmas challenges on here, I may acutally get them sent out this year!
Here is my card:

View of Entire Card Front

Close-up of handmade embellishemnt

Close-up of bird I cut from patterned paper

Even though this is a terrible photo of my card, it does give you an idea of just how much glitter is on the card and how well it sparkles.

Supplies List
Cardstock for base of card and Kraft coloured:  Recollections
Patterned Paper and bird image:  K & Company
Red Glittered Cardstock:  DCWV
Ribbon:  Michael's Crafts
Spellbinders Nestabilities:  "Labels 17"
Punches: "Curly Label" Stampin' Up & "Snowflake" Paper Shapers
Bee Creative Tape Sheets
Red Brad:  Stash
Garden Green Ink pad:  CTMH
Burnished Velvet Technique: Jewel Glitter Ritz in Empire Green, Spice Brown & Celadon

For my glittered card base, I covered the base with Bee Creative Tape sheet cut to fit and covered that with Celadon Glitter Ritz. The glittered embellishment in the upper right corner was made by punching the Curly Label from kraft cardstock and Bee Creative tape sheet. After applying the punched tape to the punched cardstock I used a piece of the non-stick peel off portion of the tape sheet to punch out a snowflake shape and placed this on the center of the taped label. I then covered the exposed tape sheet with Spice Brown Glitter Ritz. Next, I peeled the non-stick snowflake shape off and covered that exposed tape with Empire Green. To complete the burnished velvet technique, use your finger to rub all over the glittered areas to make it sparkle like wild. I added a metalic red brad to the center of my snowflake and some ribbon, thus creating a handmade tag. My tag and bird were attached to the card with 3D foam tape squares to add some more dimension and depth to my card.
I love using the Glitter Ritz and can hardly wait to get more colours to play with. If I happen to notice that some of my cards aren't as glittery after awhile, I just have to rub the Glitter Ritz again and voilah, glittering like new again! I also keep all of the protective covering that I peel off of the Bee Creative tape and use it to punch various shapes from for creating different shape patterns in Glitter Ritz later on. These tape sheets are one product you don't ever want to use in your Cricut machine. The adhesive is super strong and difficult to clean off regular punches, never mind a Cricut blade!!

I am entering this card into the following challenges:
52 Christmas Card Throwdown - June Embellishment Challenge
Crafty Hazel Nuts Christmas Challenge - CHNC challenge 78: let's get inky
The Pretty Little Ribbon Shop - Challenge # 11- Lots of Layers
Cupcake Craft Challenges - Cupcake 198... Birds of a Feather
Pile It On - Challenge #26 - Make your own embellishments
Robyn's Fetish/IDIC Challenge # 113 - "NO FLOWERS ANYWHERE AT ALL"
Holly Jolly Christmas Challenge - It's a Bingo Challenge ( I used the top row: Glitter, Brads & Ribbon)
Fashionista Challenge -  #4 "Winged Things"
Always Playing With Paper - Merry Monday #26 Using their sketch

Well friends, thats it for me tonight; I'm pooped! I haven't been sleeping well the past couple of nights. I think Mynnette and I share this insomnia pattern since she has been complaining of the same troubles lately, lol. I am off to try and relax a bit before fighting with the Sandman again tonight.
Thanks so much for popping by to check out my card.
Hugs xo

Sunday, June 24, 2012

Jace's 1st Birthday Card

HAPPY 1ST BIRTHDAY TO MY GRANDSON JACE

In honor of his first birthday, I have made him a red, white and blue card with lots of glittery stars. For Jace's card, I used a sketch from Crafting Life's Pieces Challenge blog.
Here is the fabulous sketch:

I really loved this sketch and look forward to using it lots; especially for easel cards. The red, white and blue colour theme came from 2 different challenge blogs: Paper Pretties Monday challenge and The Poodle Parlour.

Here is Jace's 1st Birthday card:
Front View

Close-up of blue glittered stars


Close-up of red glittered stars

Close-up of white glittered striped I made on the red paper


Inside of the card
Supplies Used:
Image - Sarah Kay stamp "Jean-Luc Playing Ball With Claude"
White Pen - Signo Uni-ball
Sentiments - CTMH "Say It in Style" and "Curly Sentiments" stamp sets
White Cardstock - my stash
Patterned Paper - CTMH "Fanfare"
Inks - Memento Black and CTMH Moonstruck and White Daisy
Copics - B21, B24, B29, C03, C05, C07, E23, E29, E31, E33, R000, R01, R20, R24, R29, R46, Y06, YG63, YR04 & Colourless Blender
Star Embellishments - I made these by using the Creative Memories star punch to punch shapes from white cardstock. I then edged each star with glue and covered that with either Martha Stewart "Brillo" or Recollections "Marine" glitter. The white stripes on the red paper were made by adding strips of Bee Creative Tape Sheets and covering that with Making Memories "Spotlight" glitter.
 I am entering this card into the following challenges:
CLP Challenges - CLP 48 - Use their sketch
Paper Pretties Monday Challenge - PPMC #44 Use Red, White & Blue
The Poodle Parlour - Red, White & Blue
The Squirrel and The Fox - Challenge 20 Make It Sparkle
Pile It On - Challenge 26 Make Your Own Embellishments (I made the stars myself)
ATC's and Cards With Attitude - Challenge 16 Anything Goes

Thanks for stopping by to visit; I love it when I get friends popping by.
Hugs xo


Thursday, June 21, 2012

Sparkling Snowman Card

Good Evening!
Tonight I want to share another Christmas card with you. I have made a snowman card with lots of glitter and sparkle goodness. Its also an easel card. I am in love with this style but am anxious to try a criss-cross card; very soon! But, I digress, lol. Back to tonight's card. I made this card in my favourite Christmas colour combination - blue and silver :). My Christmas ornaments are all in these colours with a few pink ornaments thrown in.
There are 2 challenges running this week that just went hand in hand together so this card is being submitted to:
52 Christmas Card Throwdown - June Theme "Snowman"

The Squirrel and The Fox - Challenge #20 Make It Sparkle
Papertake Weekly - Bingo (ribbon, gems & punches)
The Crazy Challenge - CCH #122 A Recipe: Use atleast 3 of the following items Ribbon/Twine, Gems/Pearls, Dies/Punches
Robyn's Fetish Challenge Blog - Challenge #112 Anything Goes
ATC's and Cards With Attitude - CHALLENGE 16 ANYTHING GOES
Sketchy Colors - Challenge #122 Sketch

Here is my card for these challenges:

Fully Open

 Close-up of top section
See how the ribbon sparkles?

 Close-up of bottom section
Here you can see how the snowflakes sparkle


View from the side to show dimension


Card closed up

Supplies I Used:
Cardstock - Recollections
Patterned Paper - DCWV
"Snow Friends" stamp set - CTMH
Punches - Martha Stewart "Aspen Snowflake" PATP and Paper Shapers "Snowflake" punch
Silver Ribbon - Offray
Rhinestones - Michael's
"Moonstruck" (blue) ink - CTMH
For the silver snowflakes, I punched them from Bee Creative 2-sided tape sheets and attached them to snowflakes punched from cardstock. I then covered them with "Silver" Glitter Ritz and added the blue rhinestone.
The falling snowflakes are made with glue and Glamour Dust. I also added Glamour Dust all around the outside edge of my snowman and the outer edge of my sentiment.
The snow on either side of my snowman was made with Flower Soft.
My snowman was coloured with the following Copics: B02, R24, R29 & YR07.

That is my post for today. Thanks so much for stopping by to look at my card. Leave a comment for me and I will comment back; follow me and I will follow you too! I am off the have a look at some of your cards now :)
Hugs xo

Sunday, June 17, 2012

Relax For Father's Day

I decided to try a 'step card' today and I am super pleased at how it turned out. I can hardly wait to make another one of these types of cards.

Here is the card I made for my sweet hubby for Father's Day:
 View of the card standing up and open


View of my card closed and laying down


Side view showing some of the dimension and folds

I am entering this card in the following challenges:

Paper Pretties Wednesday Challenge - PWC210 Summer Inspiration
Craft A Scene - Beach Scene - A Bit of Sand and Water
Dream Valley Challenges - Challenge 34 - For that Special Guy
Delicious Doodles Challenges - Challenge #21 - For the Fellas
Cardmadfairy's Digi Days Challenge - Father's Day or something masculine
The Pretty Little Ribbon - June Challenge # 11- Lots of Layers
The Paper Shelter - Challenge #68 Anything Goes
C.R.A.F.T. Challenge - #159 Father's Day
Simply Create Too - CHALLENGE #15 - "HAPPY FATHER'S DAY [ OR FOR A MALE]"
The Poodles Parlour - RED WHITE BLUE
Card Makin' Mamas - Challenge #47 - Father's Day
Stamptacular Sunday Challenge - Challenge #168: Fabulous FOLDS!
ATC's and Cards With Attitude - CHALLENGE 16 ANYTHING GOES
I will be back tomorrow to list everything I used on this card.
Thanks so much for stopping by to visit.

Hugs xo

Thursday, June 14, 2012

White Christmas

Hi again! I'm back with a second card today .....whoohoo! This time, I want to share a Christmas card with you. It turned out WAY better than I thought and I am super pleased with it. I made this card for the current challenge over at 52 Christmas Card Throwdown. This time, Mynnette had a colour challenge for us.
Mynnette's Colour Challenge #6 inspiration photo:
I loved this picture the moment I saw it. Every time I am outside during the winter months, I look for trees laden with snow to photograph, just like the trees in this picture. As I worked on my card for this challenge, I became more and more excited due to the way it was turning out. I love it when the finished product looks exactly the way I imagined it would.

Here is my card:

View of the front
The tree and church are heat embossed


Close up of the dry embossed snowflakes


A better picture of the heat embossed sentiment


See how the heat embossed tree sparkles?
(It was hard to get the right angle to show the sparkle)


Sentiment on the inside is heat embossed


I am so happy with this card that I plan to make a couple more; all in white of course.

Recipe:

White cardstock - from my stash
Silver Embossing Powder - CTMH
Iridescent Ice Embossing Powder - Stampin' Up
'Northern Flurry' Embossing Folder - Stampin' Up
Sentiment - 'Card Chatter - Christmas' stamp set - CTMH
White ribbon - Sheer Creations
Rhinestones - CTMH
Tree & Church image - 'A Wish For Peace' stamp set - Stampin' Up
Martha Stewart PATP 'Aspen Snowflake' set

Well, that is it for me today friends. Two cards and 2 posts in one day; I think I need a computer break, lol. Thanks for popping by to see my card and visit with me. Have a good evening.

Hugs xo

Velveteen Wishes

Good Afternoon:
Today, I have a card I'm sharing that is made using a new (to me anyway) stamping technique called Velvetten Stamping. I found the tutorial on a blog called Technique Tuesday. It is run by Mynnette and she has some awesome ideas for cards. Be sure to pop by her blog and say 'hello'. Mynnette also runs 2 other blogs that I visit; On A Stampage and 52 Christmas Card Throwdown
While this card was fun to make, it didn't turn out like I pictured it at all. It is no where near as nice as Mynnette's, but I told her I was going to give this technique a try so that's why I'm still posting it. I guess maybe I should have stuck to a white cardstock and tried to find a matching ink for my background. For a GOOD sample of this technique and how its done, check out Mynnette's tutorial on the Technique Tuesday blog. Oh well, crafting is a learning experience sometimes too lol.

Here is my card:

Front View


Inside of Card

As you can see, this card is a "clean & simple" type. I didn't actually have a background stamp that was large enough for the first stamping on the front so I made my own background stamp by arranging a few smaller stamps into a group on a large acrylic block. Also, the inks I used didn't allow for any delay when it came to dabbing the ink after stamping the solid images. My inks dried VERY fast. At times it seemed I was throwing the stamp down I was trying to move so fast, lol. I also attempted some masking while stamping the Moonstruck flowers and New England Ivy leaves.

Recipe:
Rhinestones - Dollarama
Sweet Leaf cardstock - CTMH
Chocolate Paper - CTMH
Ribbon - CTMH
Inks - Sweet Leaf, Tulip, New England Ivy, Moonstruck - all CTMH
Stamp Sets - "Joy Forever", "Say It In Style", "Curly Sentiments", "Treasures" - all CTMH  

I am really looking forward to trying the next technique Mynnette has posted on the Technique Tuesday blog. It is 'Faux Pressed Flowers' and I think I will be much more pleased with the card I make for that.
Thanks for stopping by to visit me today.
Hugs xo

Friday, June 8, 2012

Christmas Card

Christmas in purple is something I have wanted to try for awhile now and today, I did. I used the sketch provided by the very talented Mynnette at 52 Christmas Card Throwdown.
 Here is the sketch she drew for this week's challenge:
I had a lot of fun with this challenge and the sketch was so easy to work with so I plan to use it again for sure. Just today, I stumbled upon another challenge blog that looks like a lot of fun called
The Squirrel and the Fox. They are located in Australia so you will have to figure out the time difference to enter their challenges. Their current challenge is "Winter or Summer" which gives you a nice choice on what to make. The blog is run by Linda and Tracey and Tracey spells her name just like I do, lol. Pop over there and have a look around as their DT has some awesome creations to share with you.

Here is my card:

View of the whole card


A view of my card from straight on


Close up of the top and some of the flowers


Close up of the bottom

Card when it is closed

I used an image by Sarah Kay again, ( I really like alot of her stamps), and I stamped it onto Copic paper with Momento Black ink. Naturally, I coloured my image with Copics (boy have I fallen in love with these markers...lol!).
Copic Colours: B00, B02, B06, BG10, BG15, BG18, C3, C5, C7, E000, E23, E29, E31, E33, G02, R000, R46, RV23, V12, V15, V17, Y06, YG63, YG67.
Papers:  lilac cardstock - Co'ordinations; striped paper - Bo Bunny; other patterned paper - Paper Pizzazz.
Spellbinders Labels 17 to cut out image and paper behind it.
Flowers:  white with puple spots, lilac & solid purple - Prima; large white flowers - Dollarama.
Rhinestones & ribbon - from my stash.
Snowflakes - K & Company.
Sentiment Stamp - Stampin' Up 'Snow Swirled' stamp set.
Ink for sentiment and distressing edge of lilac cardstock - CTMH Pansy Purple.
Today was also the first time I have ever used my Cuttlebug. I have used Cuttlebugs that belong to other people before but never mine. I have all kinds of embossing folders and currently own 3 different Spellbinders sets so this tool is going to come out of its box a lot now lol.

I am entering this card in the following challenges:
52 Christmas Card Throwdown - sketch challenge #6
Addicted To Stamps - Challenge #31 - Bingo This time I used the top row of the Bingo card: Lilac, Monochromatic & Bling Bling
Simon Says Stamp - Diamond Jubilee - Use Crowns and/or Gems
Crafty Card Makers - Distress It
Pretty Little Ribbon Shop - Challenge #11 - Lots of Layers
The Squirrel and the Fox: Challenge #19 Winter or Summer

Well, thats it for me for today anyway. Thank you so much for stopping by to visit me again. I truly enjoy having all of you come by and leave me little comments; I read each and every one of them.
Hugs xo